Wednesday, November 29, 2017

Seasons Greetings Wreath

 Today I wanted to share a wreath I made and sold at the craft Bazaar.  I had forgot to take pictures of it before I left, so I had to use the door at the Bazaar.


I have seen a lot of the cone folded wreathes on pinterest as I am sure you also have.  But...I haven't made one since I was a kid.  So it was time to give it a try.

For the base I cut a piece of chip board from the backing pieces that come with the DSP.  I used the largest circle from the retired Circles Collection.


I cut 16 6 x 6, 15 5 x 5 16 4x 4  from the Merry Music DSP. The amount of cones you make does depend on the size of circle you start with.


I attached all the cones with a glue gun. After gluing all the cones down now you can decorate.  I stamped the Seasons Greeting in Basic Black and die cut with the layering Ovals.  Layered that on top of a piece of Basic Black.  Before attaching it to the wreath I added ribbon and sequence.

To finish off the back side I die cut a piece of Basic Black the same size of the chip board.  I added a piece of Basic Black Shimmer Ribbon then hot glued it all together.  Don't forget to add a little bling to the greeting.


I do apologize that the photos are a little dark but I had to work with what I had.

Product List
Circles Collection Framelits Die
[130911]
$27.00

I am working on a new one for my door, I will post pictures when I get it finished.

Hope you enjoyed, if you have any questions let me know.

Happy Stampin',
Debbie

Sunday, November 26, 2017

Free Shipping on Cyber Monday

Stampin' Up is getting in on Cyber Monday by offering FREE Shipping.

It runs from November 27 12:00 AM to November 27 11:59 PM MT.

I have also created a Hostess Code  ADXWEBQ9.

 Let me know if you have any questions or would like to place an order.  I am here to help!

Happy Stampin',
Debbie

Shop Now!


Friday, November 24, 2017

Christmas Shadow Box

Happy Black Friday!!

I guess you could say today is the official start to Christmas.  If you are out shopping I hope you find lots of great deals and if you are one of those that chooses not to do the Black Friday Shopping, I hope you are enjoying your day.

Today I wanted to share four different shadow boxes I made recently for a craft bazaar.  I want to give credit to Amanda @ scrimpingmommy1.blogspot.com.  who posted a great video on how to make these.  After you make the first one, you will realize how easy they are.


These would make a quick easy gift for someone.  I purchased the snow & bells at my local Dollar Store.


Snow or Bells I couldn't decide what I liked the best.


Just so darn cute! I'm thinking these might also be great for a Spring project or Mothers Day Gift.


Remember for full instructions and a video check it Amanda @ scrimpingmommy1.blogspot.com
 
Thank you Amanda for sharing this.

If you have any questions, please let me know.

Happy Stampin',
Debbie

Thursday, November 16, 2017

Big News and SU Extravaganza Sale!

We have a new product coming out!!


It’s big news when something breaks the mold and changes everything. The Stamparatus will change the way you stamp, and before long, you’ll wonder how you crafted without it!
Why do YOU need one? You’ll fall in love with stamping all over again when you learn everything you can do with it!
  • Make multiples with ease
  • Consistently stamp crisp, clean images
  • If you want a darker impression, apply more ink and restamp—no need to start over
  • Make fewer mistakes, saving time and money
  • Easily create 2-step, 3-step, and 4-step stamped images using reversible plates
  • Develop new and specialized stamping techniques with adjustable stamping plates and precision placement
I need product details!
  • Compatible with Stampin’ Up!’s red rubber and photopolymer stamp
  • Foam mat to use with photopolymer stamps
  • Rulers and gridlines for quick measuring
  • 2 open sides so you can stamp on larger paper
  • 2 reversible plates: a total of 4 surfaces to work with
  • 2 magnets to hold the paper in place
  • Magnet storage areas
  • Retail Price–$49.00 USD

 The global launch will feature three reservation windows. For each window, please note the following: 
  • Reservation quantities are while supplies last.
  • 1 tool per customer per reservation window.
  • You may participate in multiple reservation windows.
  • In order to reserve your Stamparatus, you are required to provide your credit card information.
  • Credit cards will not be charged until the Stamparatus ships from our facility. When you close your order, be sure to verify that your credit card and shipping information is correct.
  • You have to have a customer account. Click here is set up a new account if you do not have one.

Reservation WindowsAvailable to Ship
November 16–30, 2017Approx. February 1, 2018
December 5–30, 2017Approx. March 19, 2018
January 15–30, 2018Approx. April 15, 2018
Have more questions:

Stamparatus Q and A Click here
How to Reserve Your Stamparatus Tutorial Click here

Reserve Now

Coming Nov. 20th - 26th Shop on line for great deals!

 
 Here is the entire list of what will be on sale.  Remember the first portion is for 24 hours only!!

If you have any questions, please let me know.

Happy Stampin'

Debbie


Thursday, November 9, 2017

Happy Holidays


Today I wanted to share a quick card using the Festive Phases stamp set and the Merry Little Christmas DSP.  Oh yea and the new Stampin Blends!!  Just realized this was the same set I used in the last post.  See how versatile it is!


Stamp the elf on a piece of Whisper White with Basic Black Archival Ink, or you can use the Memento Black.  I have heard some mention a little bleeding if you use the Archival.  I did not have that problem, but it might come down to drying time also.  Die cut oval out and die cut oval out of the Basic Black piece.  


I choose to color just the shoes and hat using the new Stampin Blends.  I used Old olive and Cherry Cobbler.

Attach all you layers and attach the elf to the Basic Black Oval and attach with dimensionals.

Product List

Hope you enjoyed, if you have any questions please let me know.

Happy Stampin',

Debbie

Thursday, November 2, 2017

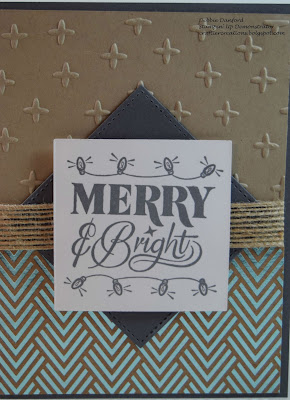
Merry & Bright

We have so many great DSP papers available I decided it was time to try and use some of them.  So today I am showing a Christmas card with the Foil Frenzy DSP.


I embossed the Crumb cake with the Sparkle embossing folder and layered it with the DSP.


Stamp the Merry & Bright in Basic Grey and die cut with the Layering Squares.  From the Stitched Shapes Framelits die cut a square out of Smokey Slate.  Attach the Smokey Slate piece, then the Burlap Ribbon, then add dimensionals to the Merry & Bright.  Although you can't tell, I also used Clear Wink of Stella on the light bulbs.


Product List

If you have any questions, please let me know.

Happy Stampin',
Debbie

Shop Now!