Showing posts with label 3-d project. Show all posts

Sunday, December 11, 2016

Christmas Bag

I am not sure where the time goes.  But, it sure seems like as soon as Thanksgiving comes & goes, the days just fly by.  I had good intentions of getting more posts done last week and it just didn't happen.

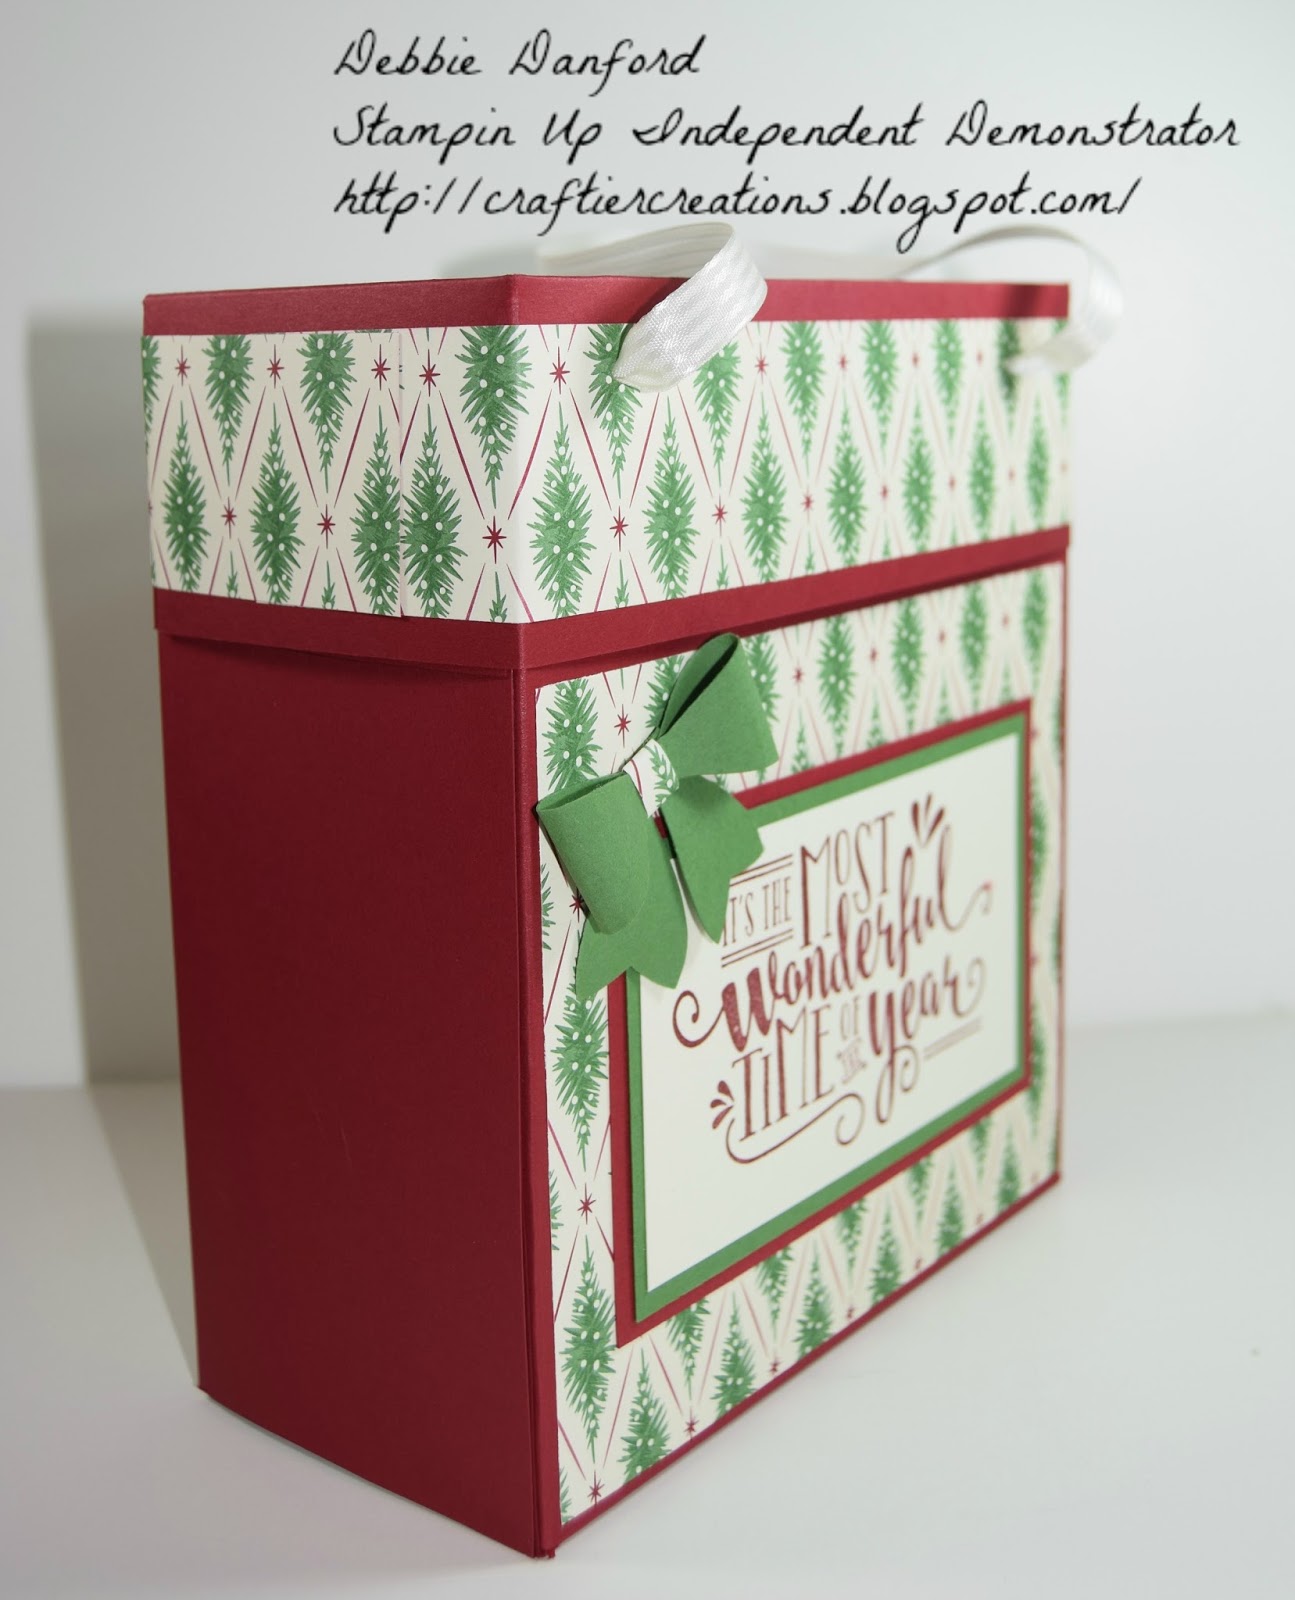
So today I am posting the large bag we made in the Tags, Bags & Gift Card class.  I have had this project on a shelf for over a year & finally got around to turning it into something.  Although it looks a little deceiving, it's actually very simple to make.  I got the idea for this project at craftycarolinecreates & she has a great video.  Thanks Caroline for the inspiration.

Now, most crafters have just been using DSP, which you can do.  I decided to use card stock & attach DSP to the front.  I felt it made the bag just a little sturdier.


 Score both 12 x 12 pieces on 2" & 9" rotate & score 3" & 9".  On 1 sheet cut away both squares as shown above.  Save these for later to use to make the bow. Burnish & fold all score lines. The 2' section is folded in the opposite direction.

On the other sheet with the 2" on the left cut up to the fold on both ends.  I glued a piece of cardboard, to the bottom.  The stuff that comes in the DSP 12 x 12 packs works great for this.  I always do a practice fold before putting adhesive on. I used Tear & Tape, but Tombo Glue or Fast Fuse will also work.  Now would also be a good time to add your DSP on the front & back.  It can be added after you make the box, but it is a little easier to do before hand. If you watch the video from Caroline, you will see that she tapes her 2' piece down.  I did mine a little different so when you put it together you can slide one flap on top of the other on the 2' piece.  It will make since as you are putting it together.

Card Board 2 7/8" x 5 7/8"
DSP 2 @ 5 1/4" x 5 1/2"
DSP 2 @ 1 1/2" x 8 1/4"
Cherry Cobbler 3" x 4 3/4"
Garden Green 2 3/4" x 4 1/2"
Very Vanilla 2 1/2" x 41/4"

Attach the DSP on the 2" top fold after you have the bag assembled. 

For the bow, I used the opposite color of the bag.  The square piece you cut out at the beginning works great for this.


Can't forget to decorate the back, & punch holes to feed the ribbon through.


Product List
Garden Green 12" x 12"" Card Stock"
[124278]
$5.95

Let me know if you have any questions.

Happy Stampin',

Debbie

Shop Now


Thursday, April 14, 2016

Baby Shower Favors

So today I finished the baby shower favors.  I have made several different kinds of treat boxes, bags & what not's.  But I wanted to come up with something a little more baby themed.   So off to Pinterest I went.  The first idea I found was from Jeanette Cobb.  She had used the Oval Framelits, which I do not have.  So...off to search again.  Then I found another similar idea from Susan Campfield.  She used the Chalk Talk Framelits, which I had.  So with both ideas in mind I came up with this.


Cut your cardstock at 4 1/2" x 2 1/2".
With your score board:
SL @ 1 1/8" & 3 1/8"
SS @ 1/2" & 2"
Die cut 2 frames out of DSP


 Fold all score lines & cut up to the 1/2" score line.  Attach Fast Fuse on all 6 - 1/2" pieces.  Then you can attach 1 frame to each side as shown above.  Fold ends in to make a box.  Punch 2 scallop oval's to make the rocker, & 2 large ovals to stamp on.  Thank you Jeanette & Susan for the inspiration.  Now what should I fill them with?  HUMMM...


Supplies used:
Product List


Hope you enjoyed, if you have any questions, or would like to place an order.  Let me know.

Happy Stampin'
Debbie


Tuesday, March 8, 2016

Yearly Card Holder

Today I wanted to share a project we made at my last Stampin Up monthly club.  I saw the original idea on Pinterest that Patti Bennett had made http://pattystamps.typepad.com/
Timeless Elegance DSP #138444

 It's My Party DSP #140552

English Garden DSP #138440


OK, so..It takes 7 sheets of 12x12 DSP.  One for the front & back & 6 for the 12 months.  Score all 6 sheets @ 4 1/4", then turn & score at 5 7/8" & 6 1/8".  I chose not to score directly in half, because I felt you might get a little more room in each pocket to store cards.  Fold the 4 1/4" up & then fold on score lines. For the front & back you need 2 pieces of solid card stock 6 1/4" x 7 3/4"  & 2 pieces of DSP 6" x 7 1/2".  Inside pieces to mount the calendar on you need 12 pieces of cards stock 3 3/4" x 5 1/2".

Attach calendar & decorate if desired.  The calendar template is out at splitcoast.  I ended up not using that one, because I wanted to stamp the months.  I used a Cinch to bind mine.

Here is Patty's original post on how she made her's.   http://www.pattystamps.com/pattys_stamping_spot/2008/03/class-project-1.html

If you have any questions let me know.

Happy Stamping,
Debbie


Wednesday, January 6, 2016

2016 Calendar


Well here we are 6 days into 2016 already!! I can't believe it.

I want to share a few pictures of the upcoming calendar class.  Although I did call it a Perpetual Calendar, technically what I made is not.  The reason being is I found these tiny calendars at Vippies.  I thought it would be nice to be able to see each full month.


Base is from the 12x12 DSP, cut down to 8 1/2 x 12.  Then scored at 5 1/4 & 6 3/4 .


DSP on base is 5 1/4 x 8 1/2 on both side.  Inside is all white.

You need 31 -  2" x 5" & 14 1" x 5" pieces of DSP.  12 for the month, 7 for the days of the week, 4 for the fist set of numbers(0-4) & 10 for the second set(0-9). 12 for the lst section which I just used for notes, (birthday's, anniversaries, or things going on for that month.


To see another color combination of this project check out the class page.

I hope you enjoyed this project I know is this electronic day & age, we all have phones that have all these fancy gadgets on them, but it is nice to still have a calendar on your desk, & you can say you made it!!

Have any questions, let me know.

Debbie

craftiercreations@gmail.com